Why should you do it?
“Using GPG, you can sign and verify tags and commits. With GPG keys, tags or commits that you’ve authored on GitHub are verified and other people can trust that the changes you’ve made really were made by you.”
Signing our commits is a great way to verify your commits and let your collaborators know that they can trust that you committed those changes in your project. We’re going to see how can we use a GPG key to sign our commits and also how to change git settings so it signs our commits automatically.
This guide will assume that you haven’t setup your GPG key yet.
Installing GPG
GnuPG should be available on your system, if it’s not, then you can download it and follow the instructions to install it depending on your distribution here: https://www.gnupg.org/download/
Setting up GPG
This is a pretty easy step as the GnuPG has a wizard that can help us fill the requirements to create our GPG key with the gpg --full-generate-key command.
We’re going to generate a RSA 4096 bit long key with no expiration date on our email.
NOTE: In order to verify your commits in Github, you must enter the email address that you have registered in Github and it should also match your email that you previously configured in git.
$ gpg --full-generate-key
Please select what kind of key you want:
   (1) RSA and RSA (default)
   (2) DSA and Elgamal
   (3) DSA (sign only)
   (4) RSA (sign only)
Your selection? 1
RSA keys may be between 1024 and 4096 bits long.
What keysize do you want? (3072) 4096
Requested keysize is 4096 bits
Please specify how long the key should be valid.
         0 = key does not expire
      <n>  = key expires in n days
      <n>w = key expires in n weeks
      <n>m = key expires in n months
      <n>y = key expires in n years
Key is valid for? (0) 0
Key does not expire at all
Is this correct? (y/N) y

GnuPG needs to construct a user ID to identify your key.

Real name: Franccesco Orozco
Email address: franccesco.orozco@codingdose.info
Comment: My First Key!
You selected this USER-ID:
    "Franccesco Orozco (My First Key!) <franccesco.orozco@codingdose.info>"
After that it will ask us to input a passphrase, remember to choose a good passphrase.
We need to generate a lot of random bytes. It is a good idea to perform
some other action (type on the keyboard, move the mouse, utilize the
disks) during the prime generation; this gives the random number
generator a better chance to gain enough entropy.
gpg: key 438D3A434DA6E6FA marked as ultimately trusted
gpg: revocation certificate stored as '/home/franccesco/.gnupg/openpgp-revocs.d/D77C79FFD77BFD0B9BCE58FE438D3A434DA6E6FA.rev'
public and secret key created and signed.

pub   rsa4096 2018-09-05 [SC]
      D77C79FFD77BFD0B9BCE58FE438D3A434DA6E6FA
uid                      Franccesco Orozco (My First Key!) <franccesco.orozco@codingdose.info>
sub   rsa4096 2018-09-05 [E]
That’s it! We were able to create our GPG key pretty easily, right? Let’s see what can we do to add it to Github.
Listing our key(s)
Now that we have created our key, we can list it like this.
$ gpg --list-secret-keys --keyid-format LONG franccesco.orozco
sec   rsa4096/438D3A434DA6E6FA 2018-09-05 [SC]
      D77C79FFD77BFD0B9BCE58FE438D3A434DA6E6FA
uid                 [ultimate] Franccesco Orozco (My First Key!) <franccesco.orozco@codingdose.info>
ssb   rsa4096/5D21EBE255188195 2018-09-05 [E]
What we’re looking in our key is the GPG Key ID, which is: 438D3A434DA6E6FA. With this identifier we can export the GPG Public key and paste it in Github.
$ gpg --armor --export 438D3A434DA6E6FA
-----BEGIN PGP PUBLIC KEY BLOCK-----
mQINBFuP6u4BEADA6ZWSjy86eMpS6OczKgkPbytA7b5lzMcdwnSccwuX0w9/fVA7
yx+fuZZuKO1rHNR96wgq4m5Z9iUM7UQ5FG9g93CXUp6kmPcast3fpQ7D13Oq6lEy
iNmxziJ3K/DQnEj8vgEl6vxDusBswRdYXHKytKt2pFngZqF/rtD0Mbf9shrGaI9B
--- SNIP ---
Hlupx07dHpBEsjaiKWL80GhKFSQNKO+oOlSZ537nRqcLUzU7zvc1qLp6Z6ZSAFjl
E3aw43pKynoLYXvxUO1vi0En//jMSG4riLZDiZBkfM21
=QqhC
-----END PGP PUBLIC KEY BLOCK-----
If you have xclip package in your system and don’t want to select the whole key then here’s a great tip to automatically add it to your clipboard.
$ gpg --armor --export 438D3A434DA6E6FA | xclip -sel c
Add GPG key to Github
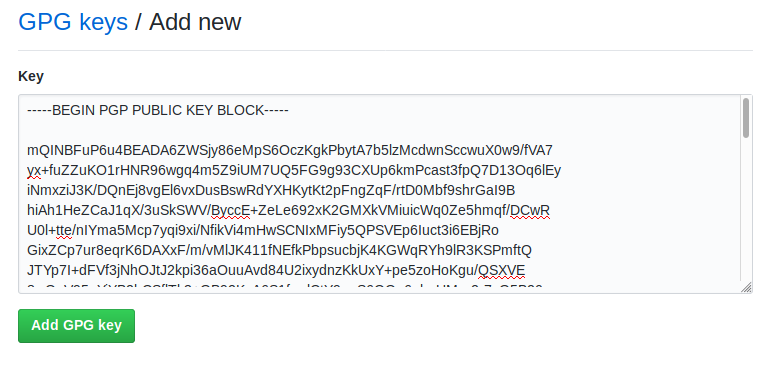
Now it’s time to paste the key in Github, this is pretty easy and self explanatory, go to SSH and GPG Keys in your Github settings and click in New GPG Key.
Here you can past your Public key and submit it.

After that, you can see that you have already added your Github key, if its says unverified it’s because it doesn’t matches your email address in your Github account, so make sure everything matches with the email in your GPG key.

Configure git with your key
Now let’s make git aware of our new key with a global configuration.
$ git config --global user.signingkey 438D3A434DA6E6FA
After that we can start committing signed changes using the -S flag.
$ git commit -S -m "Signed commit!"
But of course, if you don’t want to set the -S flag every time then you can set it as default in your commits.
$ git config --global commit.gpgsign true
Push a signed commit
Now, go ahead and feel free to push a commit in Github. From now on, all pushed commits will show as verified in your commit history.

This will give you more credibility and security to your projects, specially if you work with sensitive date or with a large number of people.
